
JOB SEARCH (CASHFLOW)
JOB SEARCH - $2,500/month
- Ivan Resume
- The Goal
- The Plan
- Where to Find Leads
- Lead List Created
- Cold Email Messages
- DM Messages
- VSL Script + Email Script
- Google Doc Tracking Sheet
COURSES / TRAINING HERE
Kyran Rawson (FB Ads)
- Offer
- Competitor Research
- Ad Copy
- Ad Creatives
- Ad Account Structure
- How To Set Up New Campaign
– Create New Campaign
– Fill out “Campaign Page”
– Fill out “Ad-Set Page”
– Fill out “Ad Page”
– Create Funnel
CAM Level 1 (Agency Setup)
Mod 1 – Overview & Landing Page
Mod 2 – Video Page
Mod 3 – Application Page
Mod 4 – Schedule & Thank You Page
Mod 5 – CAM Website
Mod 6 – CAM Email
Mod 7 – Cam Organic Traffic
CAM Level 2 (FB Ads)
CAM Coaching Calls
Mod 01 – FB Ads Account Setup
Mod 02 – Facebook Pixels
Mod 03 – Pixel Sniper Method
Mod 04 – FB Ads Introduction
Mod 05 – Facebook Re targeting Ads
Mod 06 – Advanced Auto Emailer
Mod 07 – Facebook Ads Targeting
Mod 08 – Facebook Ads Launching
Mod 10 – Lumpy mail
Mod 11 – Sales Training
Mod 12 – Adding Testimonials
Kallzu - FAM (FB Ads)
Page 1 – Module 1-4
Webinar + Sales Page
Mod 01 – Overview & Niche Select
Mod 02 – Mock-up Funnels
Mod 03 – Building Your Funnel
Mod 04 – Review Your Funnel
Page 2 – Module 5-7
Mod 05 – Personalized Video
Mod 06 – Your First Client
Mod 07 – FB Ad Account Setup
Page 3 – Module 8-11
Mod 08 – Preparing Client Campaign
Mod 09 – Creating The Video FB Ad
Mod 10 – Pixels Installations
Mod 11 – Terminologies & Structure
Page 4 – Module 12-13 LAUNCHING ADS
Mod 12 – ADS Launching
Mod 13 – Getting Paid
Page 5 – Additional Resources
Ivan – Training Manuals
Dino Gomez Vault – Templates
Dan Henry - FAFE (FB Ads)
Mod 0 – The Nutshell
Mod 1 – The Bait
Mod 2 – The Funnel
Mod 3 – The Ad
Mod 4 – The Agency
Mod 5 – Pixel Hero Boss
Mod 6 – Bare Bone Basics
Bonuses
Coaching Calls
Funnel Downloads
Dan Henry - 30 Day Agency
Webinar & Sales Page
Mod 0 – Mindset
Mod 1- Getting Results for Clients
Mod 2- Landing Your First Client
Mod 3- Scaling to Multiple Clients
Mod 4- Managing Your Agency
BONUS Module
Joel Kaplan - 7 Figure Agency
Welcome! (WATCH FIRST)
Pre-Pillars
Pillar 1 – Setting Appointments
Pillar 2 – Closing Appointments
Pillar 3 – Systems & Scaling
Pillar 4 – Client Results
Resources
Bonuses
FAQ Library
Instantly - Cold Email Training
- Getting started. Overview & Numbers
- Instantly Guide – How To Send 1000 Cold Emails Day With 50%+ Open Rate
- Resource List (Downloads)
- Domain and Email Setup Introduction
- Buying domains
- Forward Domain To Main Domain
- Setting up Google Workspace
- Setting up SPF
- Setting up DKIM
- Setting up DMARC
- Getting & Verifying Leads
- Leadhype
- LinkedIn Sales Navigator – LeadHype
- Apollo.io
- Other sources for getting leads
- Verifying Leads – BulkEmailChecker
- Formatting Lead List
- Email Copy & Resources
- Email Sequences
- First Lines & Personalisation
- Cold Email Sequences
- Setting Up Instantly & Adding Accounts
- Creating A Campaign – Instantly
- Optimizing & Scaling
- Analyzing Campaigns and Benchmarks’
- Scaling Up
- The End
New Job - FB Ads Training ?
- Setting Up New Campaign
FACEBOOK AD SWIPE-FILES
Dentist Swipe Files
- Ivan Dentist Offer (Free)
- Ivan Dentist Offer (Paid)
- Ivan Dentist Offer (Pro)
- Dental Agency Offers (40)
- Teeth Cleaning (40)
- Teeth Whitening (40)
Agency Offers Gold (Ivan)
Million Dollar Agency (Swipe-Files)
- Landscape KR-Reliance
- HRT Agency (Hormone Replacement Therapy)
- PinPoint Scaling (Medspa)
- Car Detailing & Paint Protection Film (PPF)
- Solar – NCT Solar
- Results Grow.com (Turf Leads)
- Roofer Grow.com (AWESOME)
- HVAC Grow.com (AWESOME)
- Short Form Content (Viral Videos) Real Estate (One Million Media)
- Joel Kaplan – Agency Labs – $500K pm
- Tyler Narducci – DFY Leads and Sales
- Plumbing & HVAC SEO
- Dentist – Umbra Media – FB Ads
- Permanent Makeup Artists
- Contractor.click
- Jeff Miller – Agency Scaling Secrets
- Boundless Leads (GOOD Acc IS DOWN)
- Charlie Morgan
- Will Nelson – Online Fitness Coaches
Different Niches Swipe
- Landing Pages (Marketing Agency)
- Real Estate Agents (HD Media House)
- Spas + Salons + Beauty Professionals (Spa Strong)
- HVAC & Plumbing (Power Selling Pros)
- Chiropractors (ChiroQueens)
- Real Estate (JungleCat Real Estate)
- Website Offer (Lyca Smith)
- Solar Leads (Sirius Leads)
- Sales Job (Cold to Sold)
- Chiropractor (Chiro Leads)
- Medspa (RevSpark Media)
- Virtual Frontdesk for Medspa (Dedicated Office)
- Land Cleaners & Excavation Contractors (Land Clearing Insights)
- Kitchen Remodeling (Scale My Kitchen Remodeling)
- Cold Prospecting To Fill Pipeline Offer (Sopro)
- Gyms Free Trial Offer (Riley Stewart)
- Water Damage Restoration Webinar (Jamie Randall)
Amazon S3 – How To Upload & Host Video & Files
Login here – https://console.aws.amazon.com/
Click Button – Sign in using root user email (Tick Root user)
Email address – ivandup1975@gmail.com
Password – Idp32291#
Verification Code – will email a verification code to ivandup1975@gmail.com
NEW VERIFICATION – Has asked me to add another verification – So i have added Google Authenticator app to my phone and linked it to AWS. Will now ask me to provide Google Auth # from my phone instead of email to log in.
Log In To Pay Bills Here – https://console.aws.amazon.com/billing/home#/
INDEX
CSS to insert 12 px spacing
Copy & Paste into Widget -> Advanced -> Custom CSS
selector p {
margin-bottom: 12px !important;
}
Login
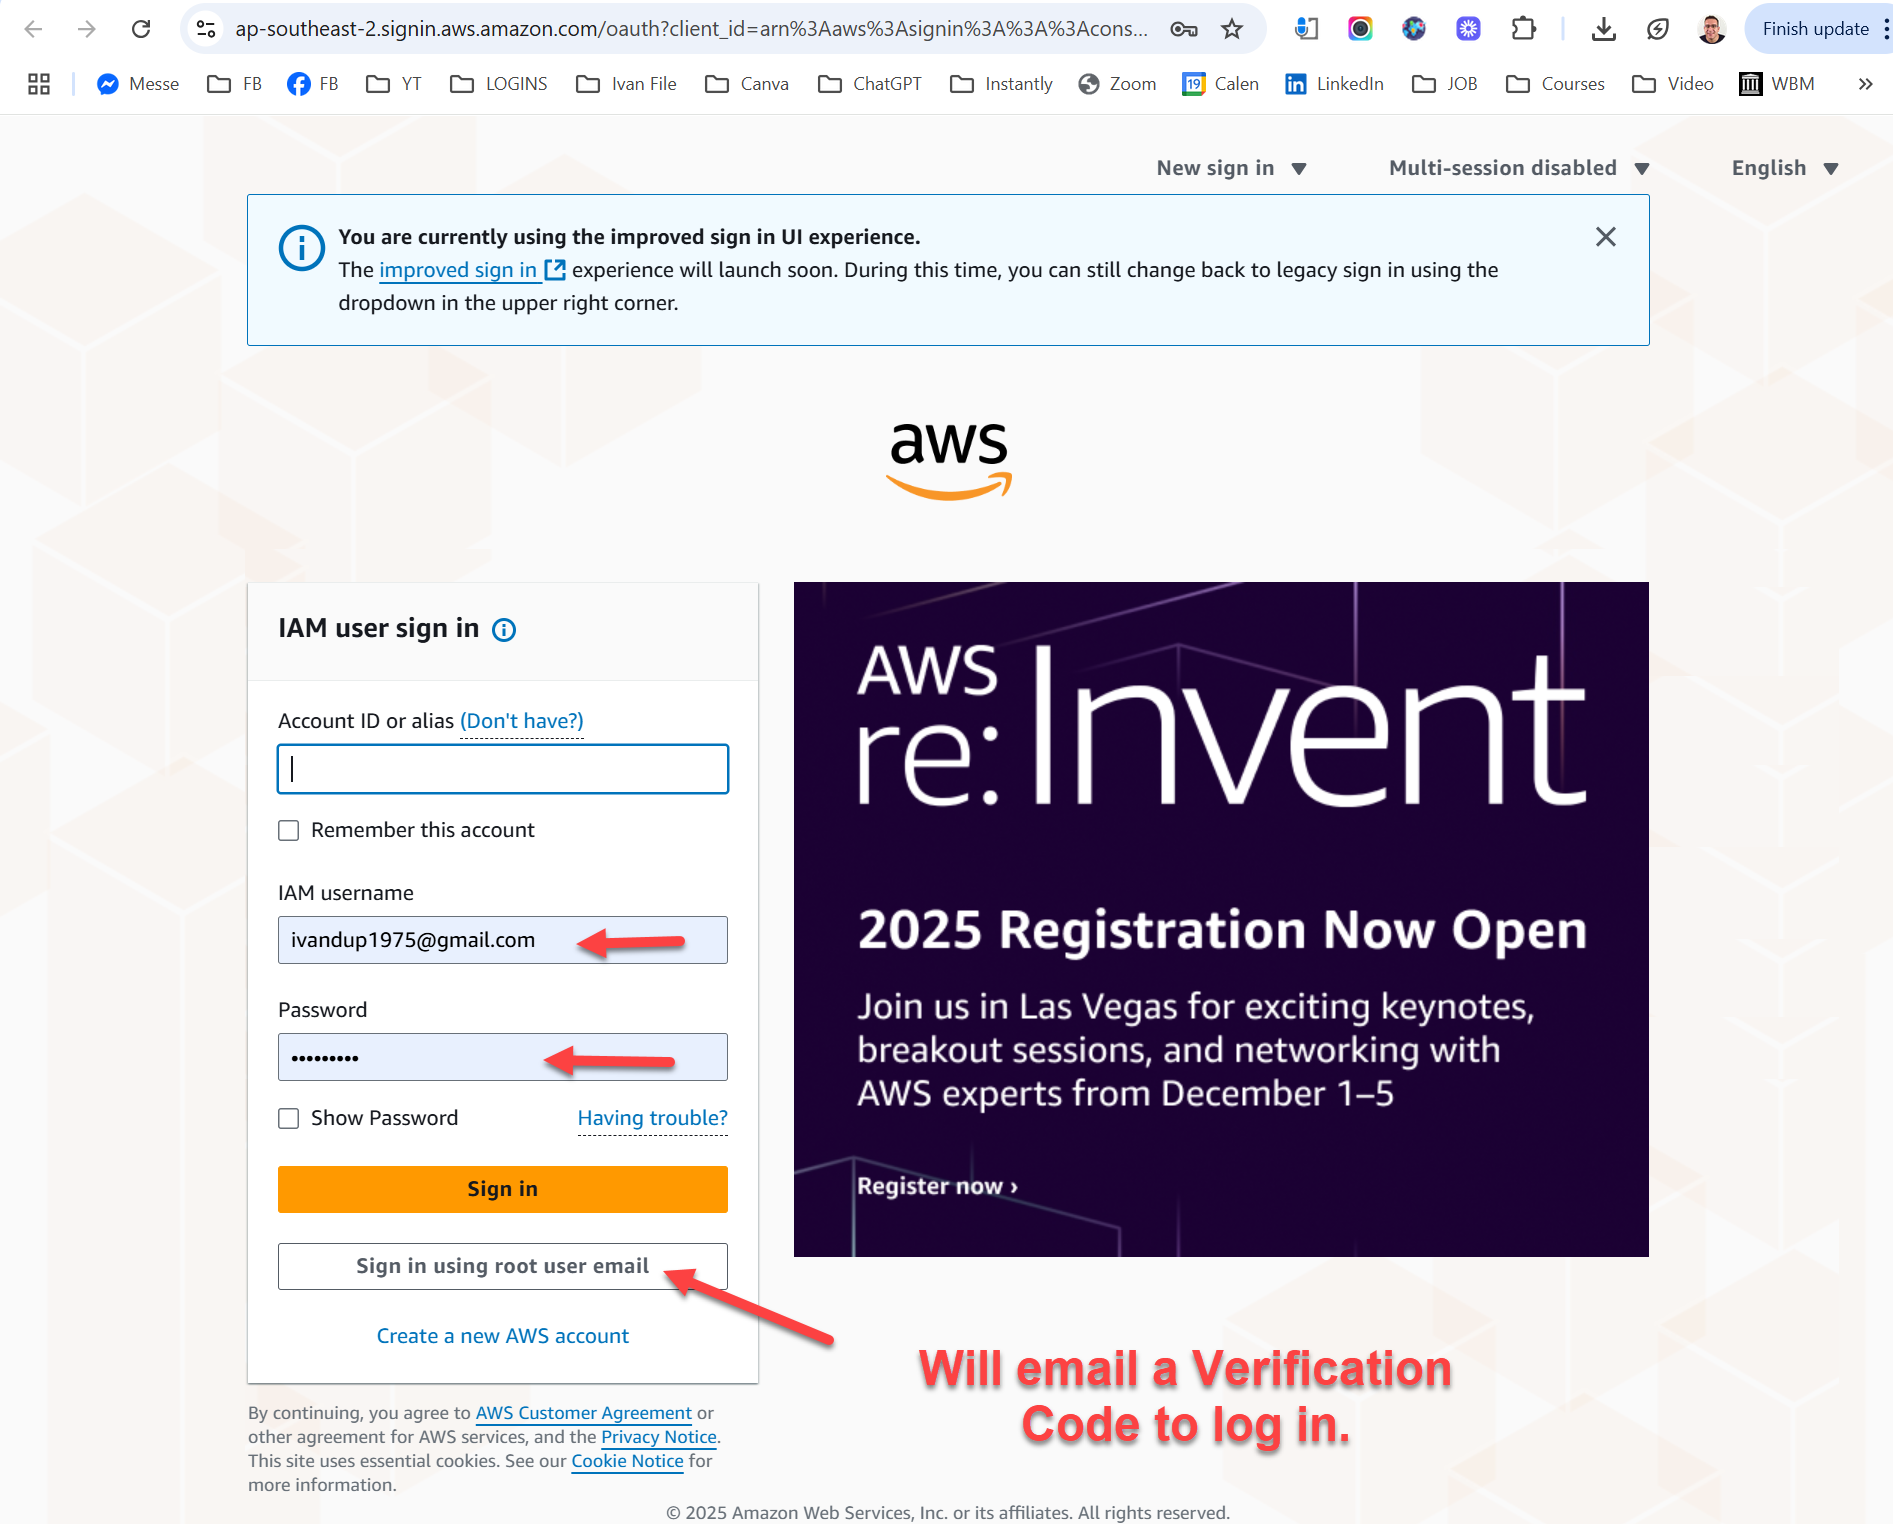
Instructions:
- Login page looks like this
- Click sign in using root user email
- Enter email & password
- Copy the verification code from email
- Now logged in
Dashboard
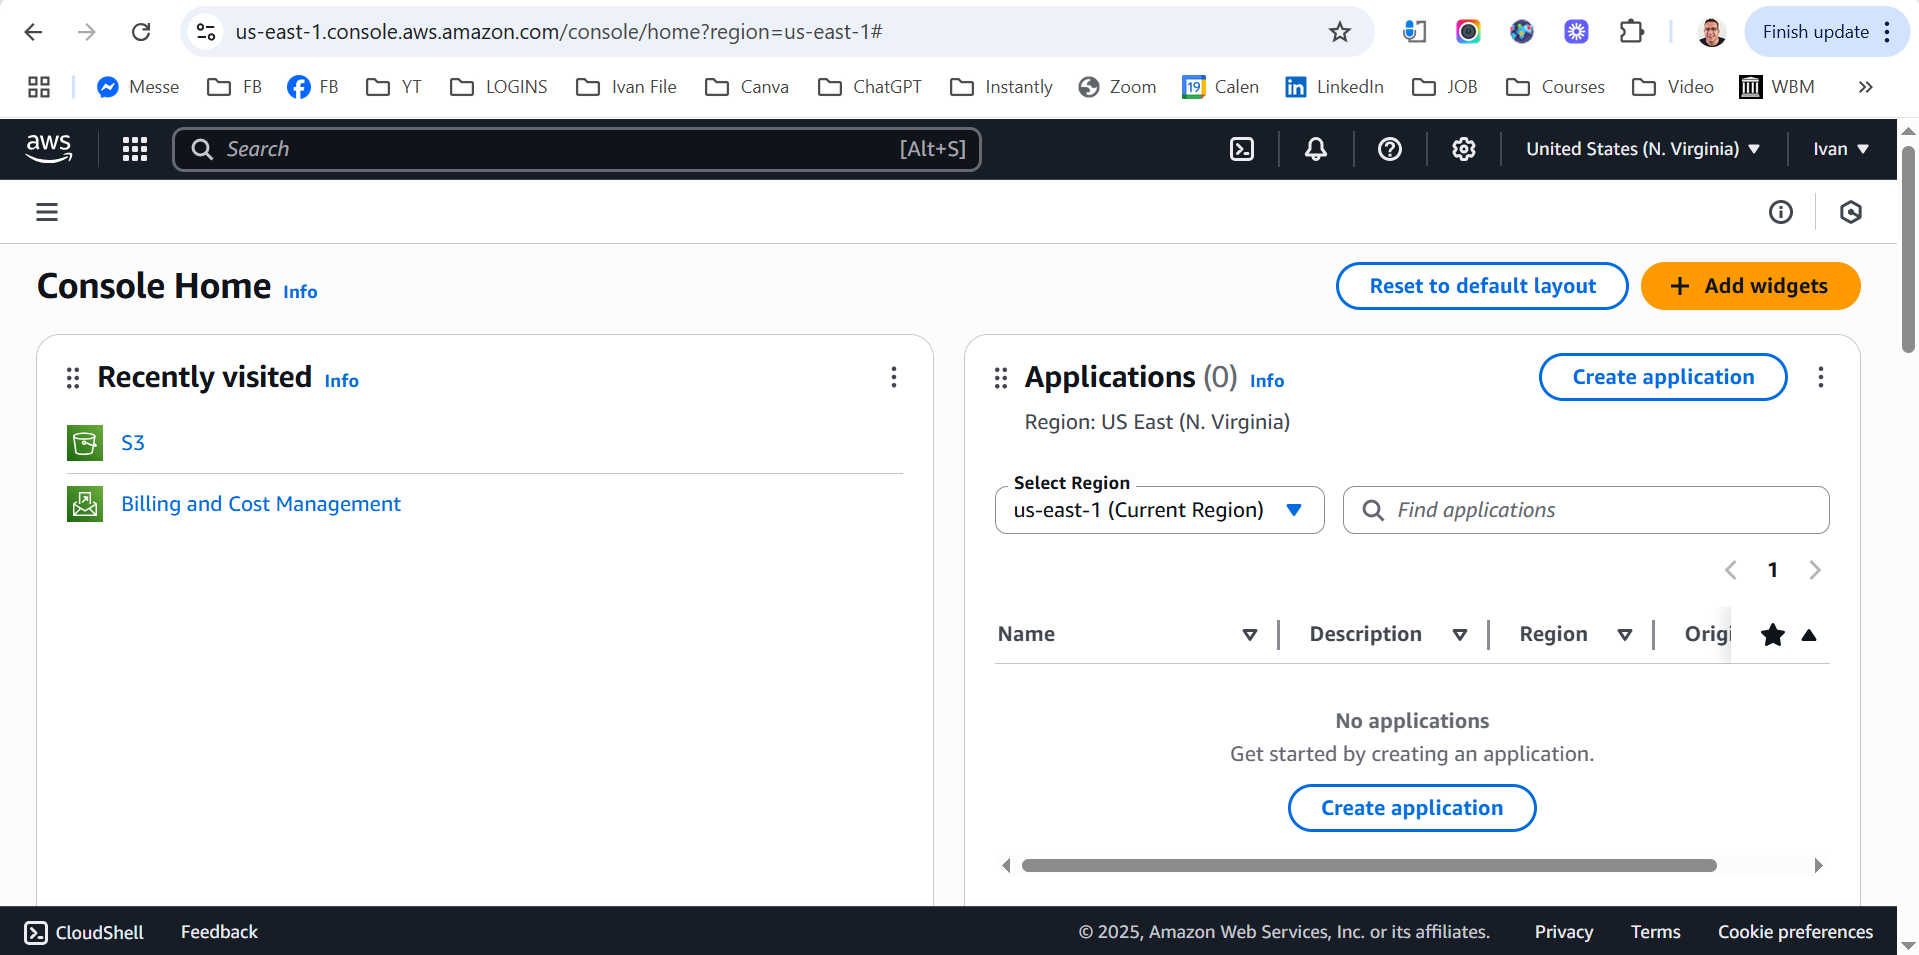
Instructions:
- This is what the Dashboard looks like
- Click on S3
- Will open next page with Summary of your buckets
Summary of Existing Buckets
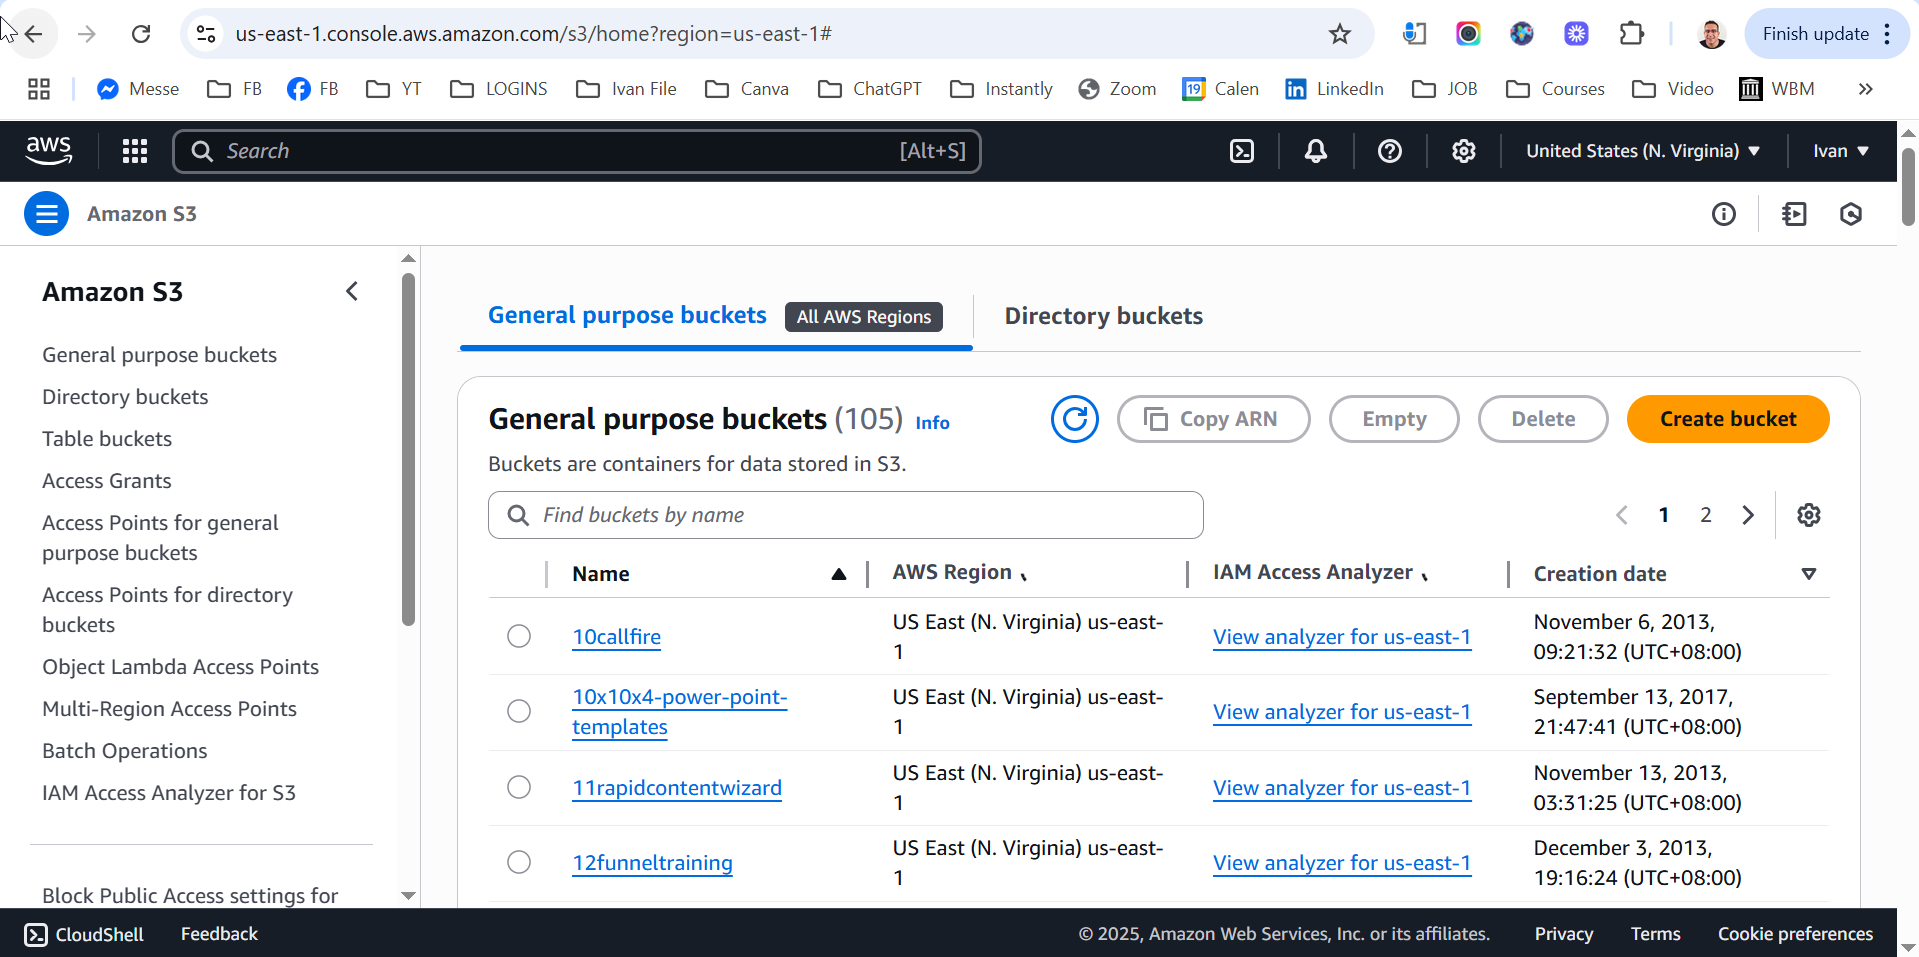
Instructions:
- Here you have your summary of buckets.
- Can navigate buckets and find content
- Click orange button top right that says “Create Bucket”
Create New Bucket
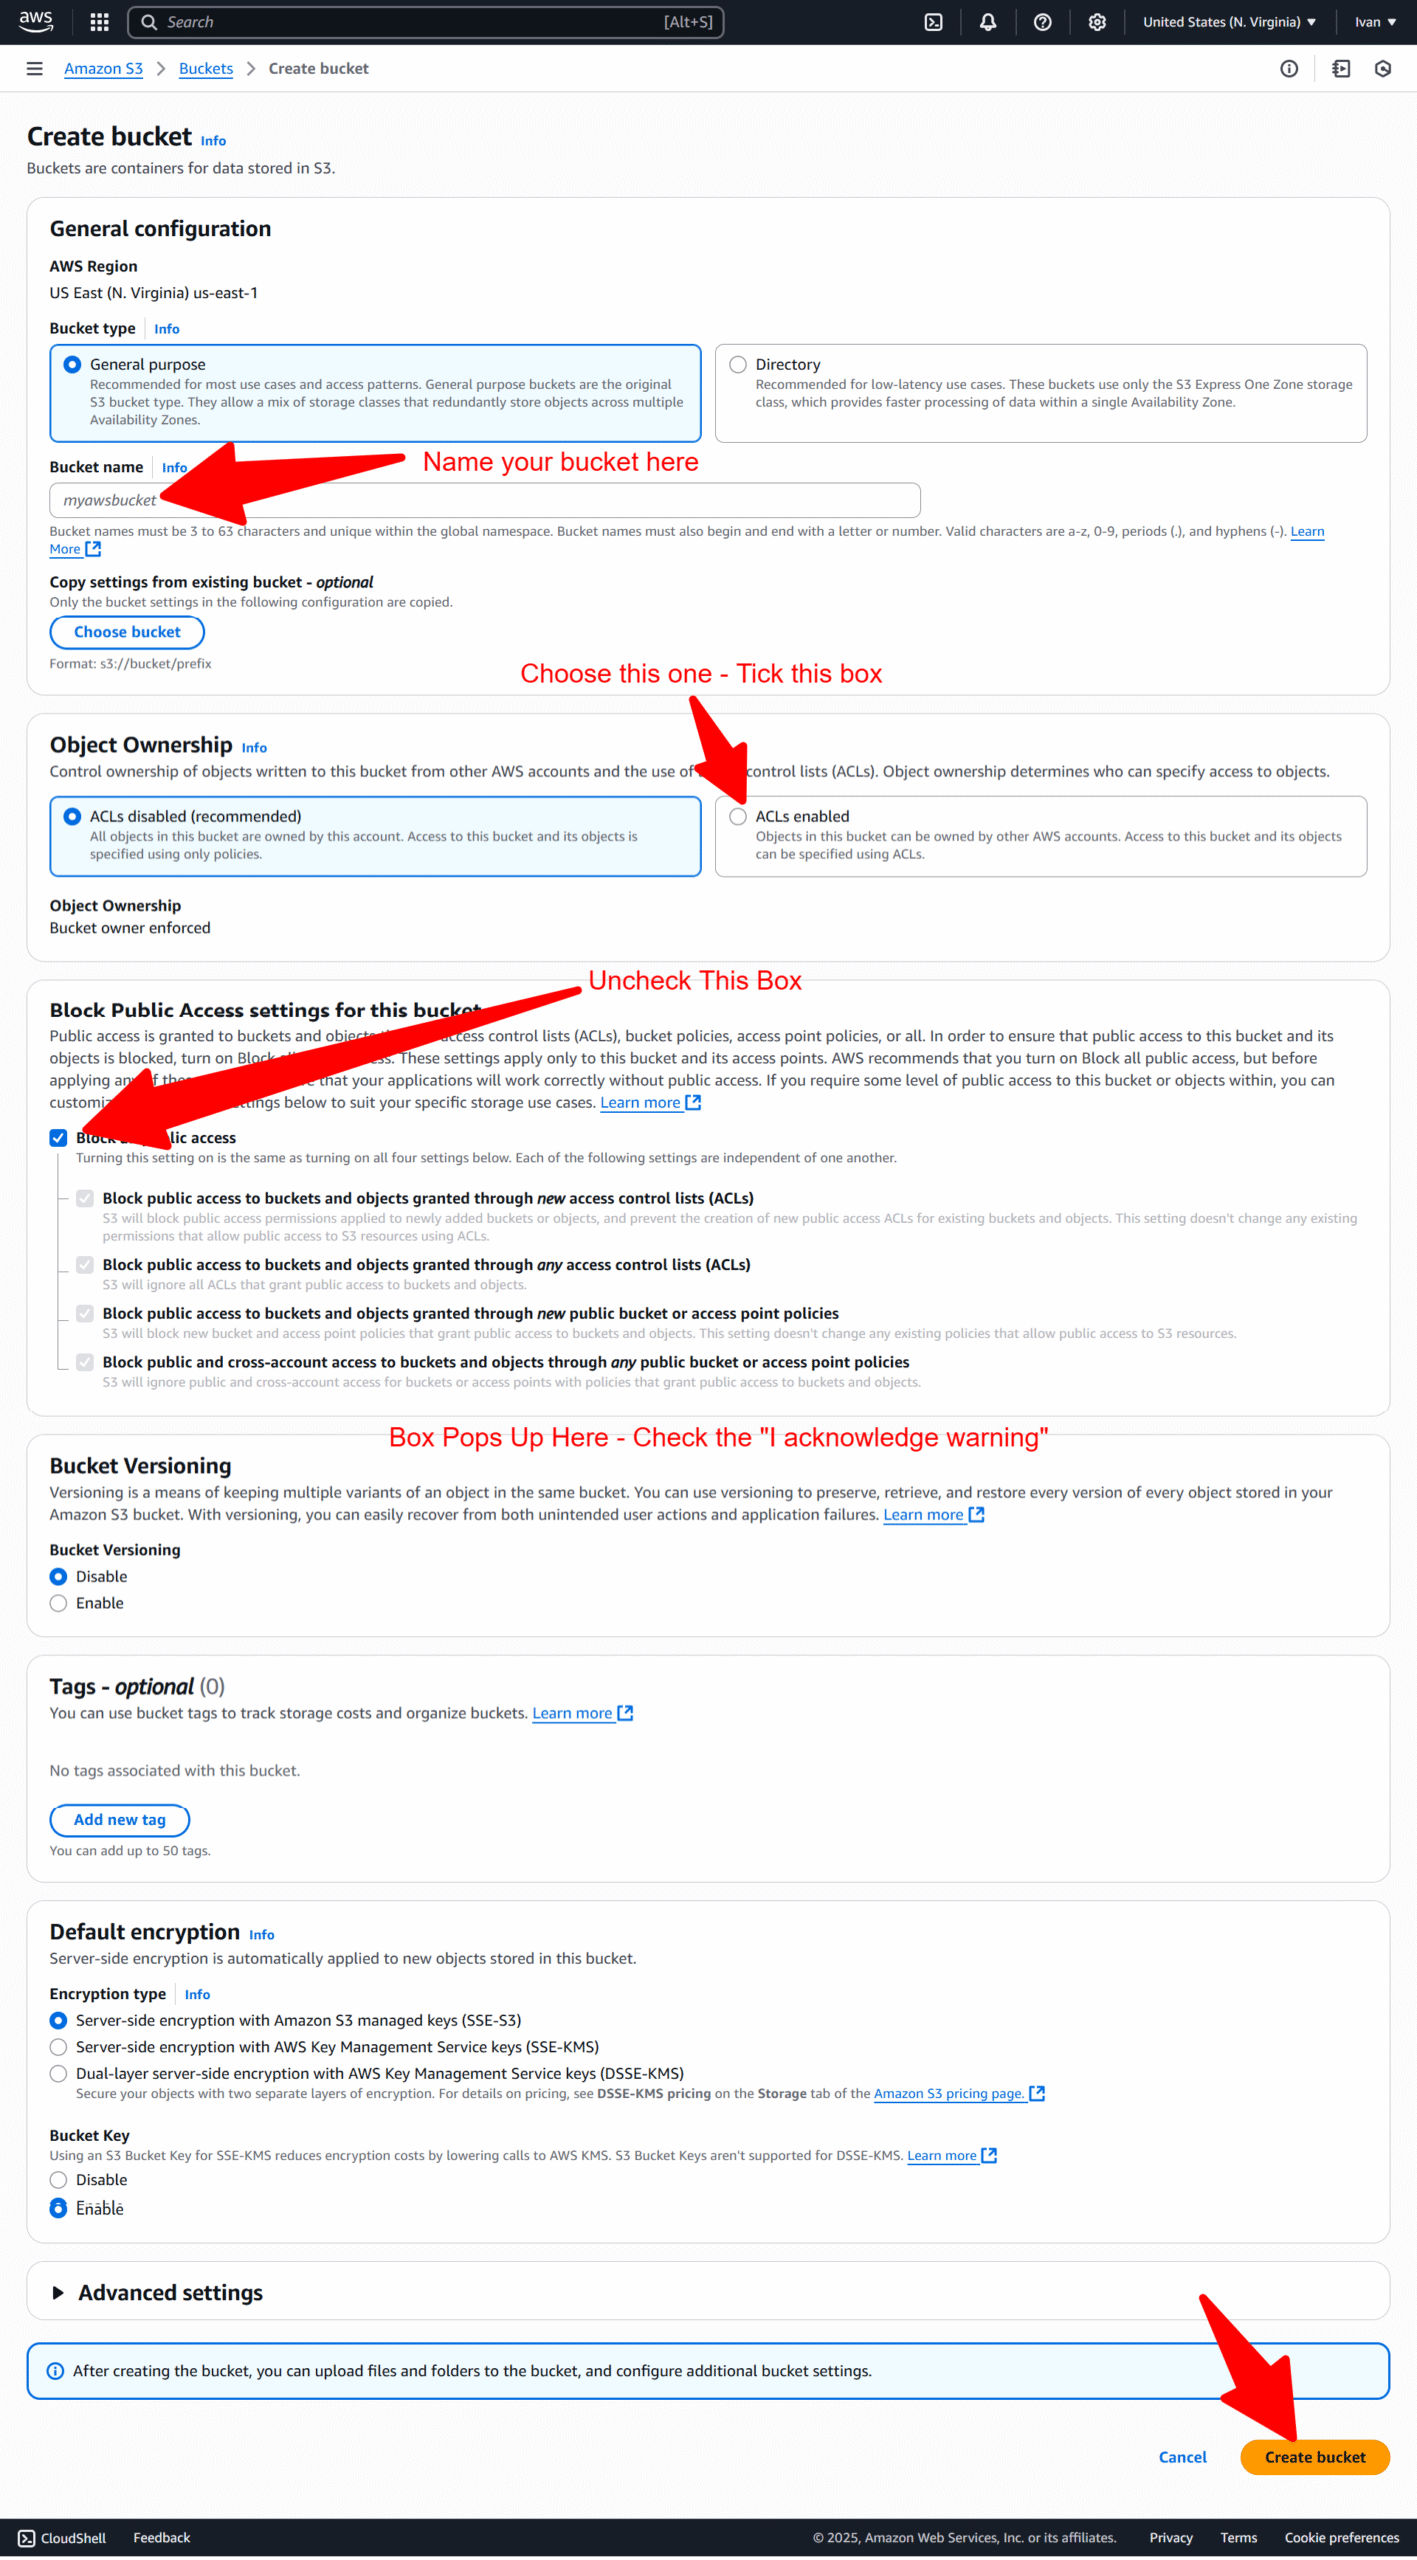
Instructions:
- Name your bucket
- Tick ACLs enabled
- Uncheck the “Block Public Access settings”
- Tick the pop up box, I acknowledge warning
- Click “Create Bucket” bottom right
New Bucket – Upload Video & Files
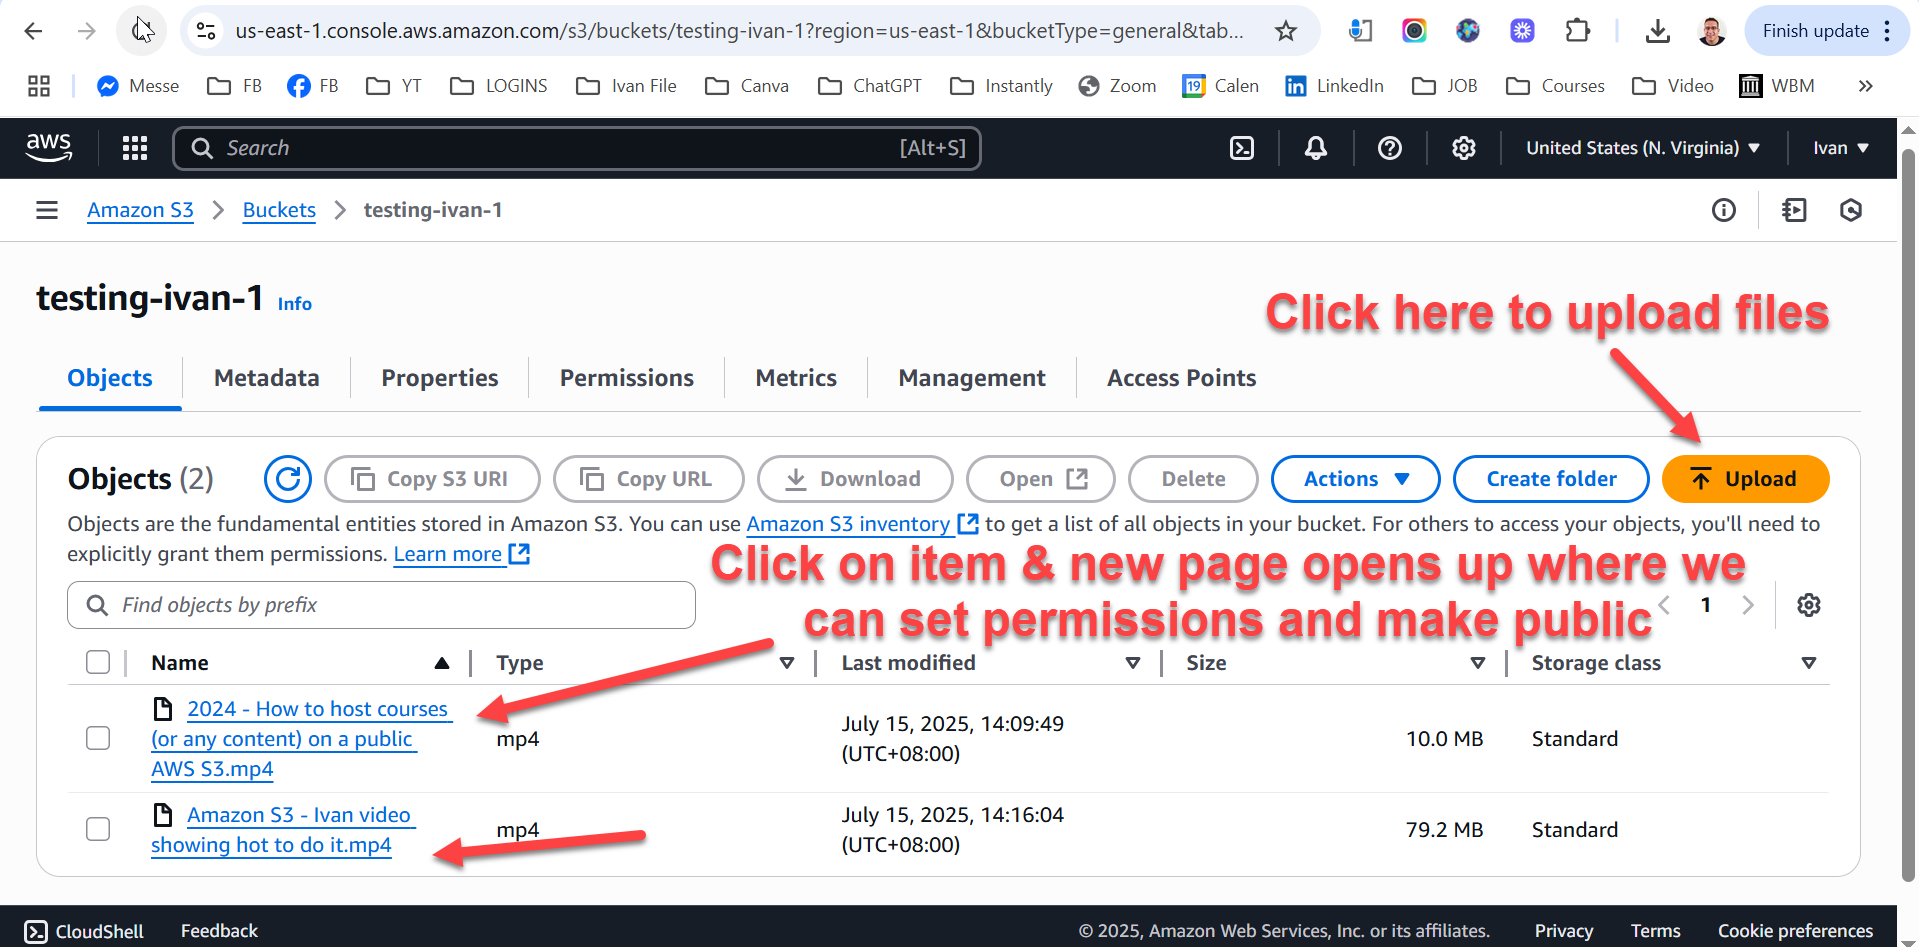
Instructions:
- You have created a new bucket
- Upload files to bucket
- Once uploaded they will appear hyperlinked in blue
- Click on item and new page opens up where we can adjust permissions
Set Permissions
Click Permissions
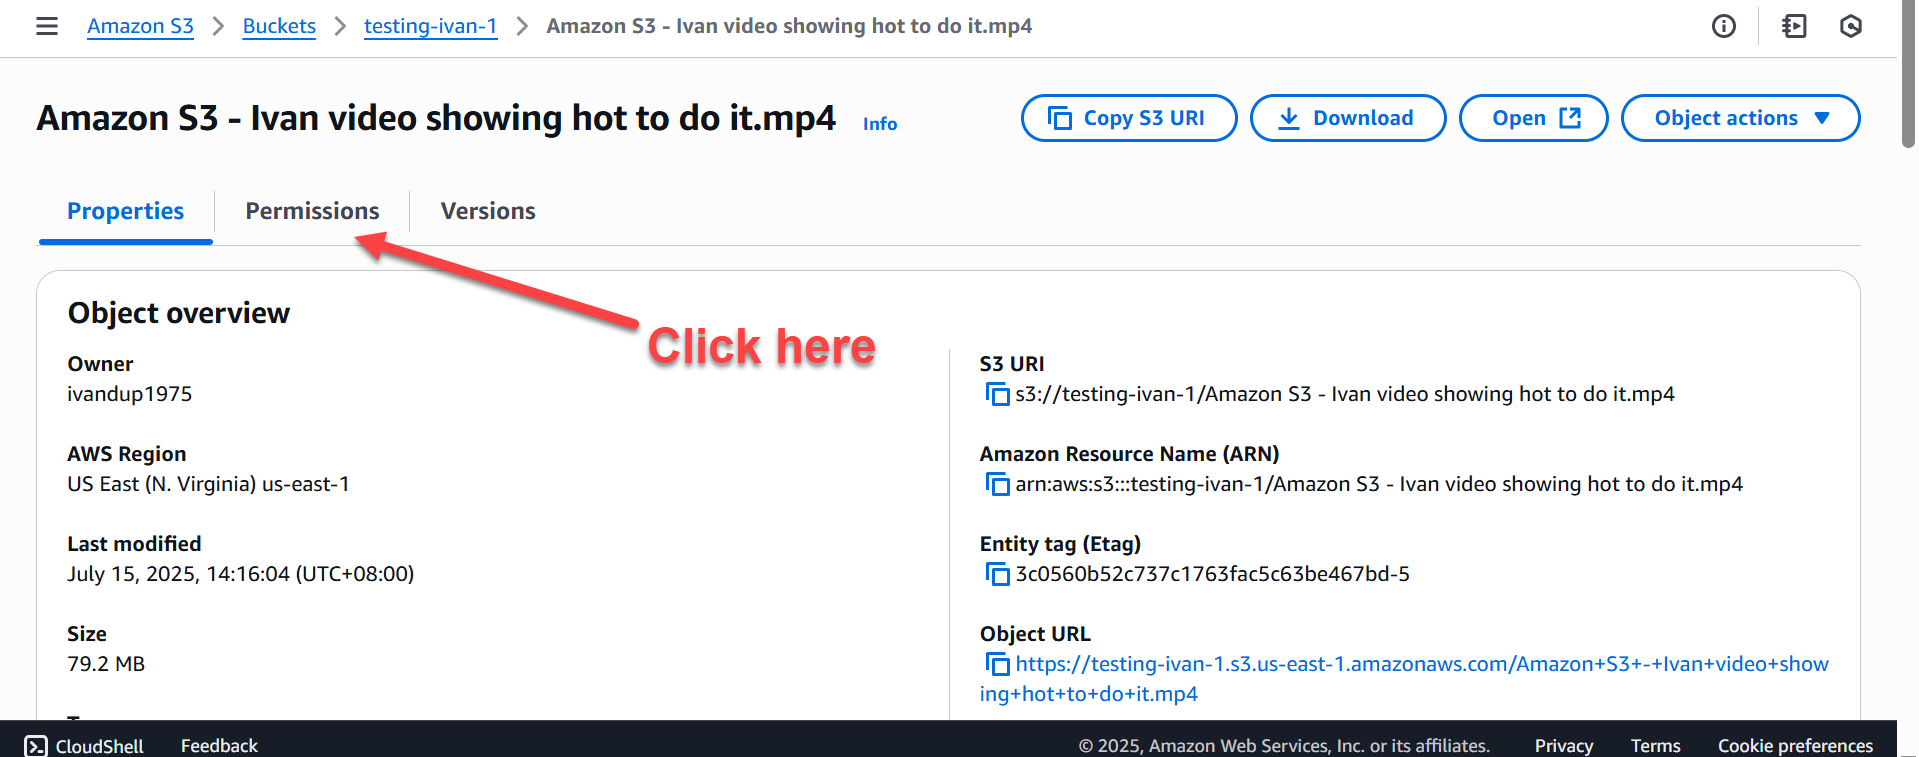
Instructions:
- On this page click Permissions
Click Edit
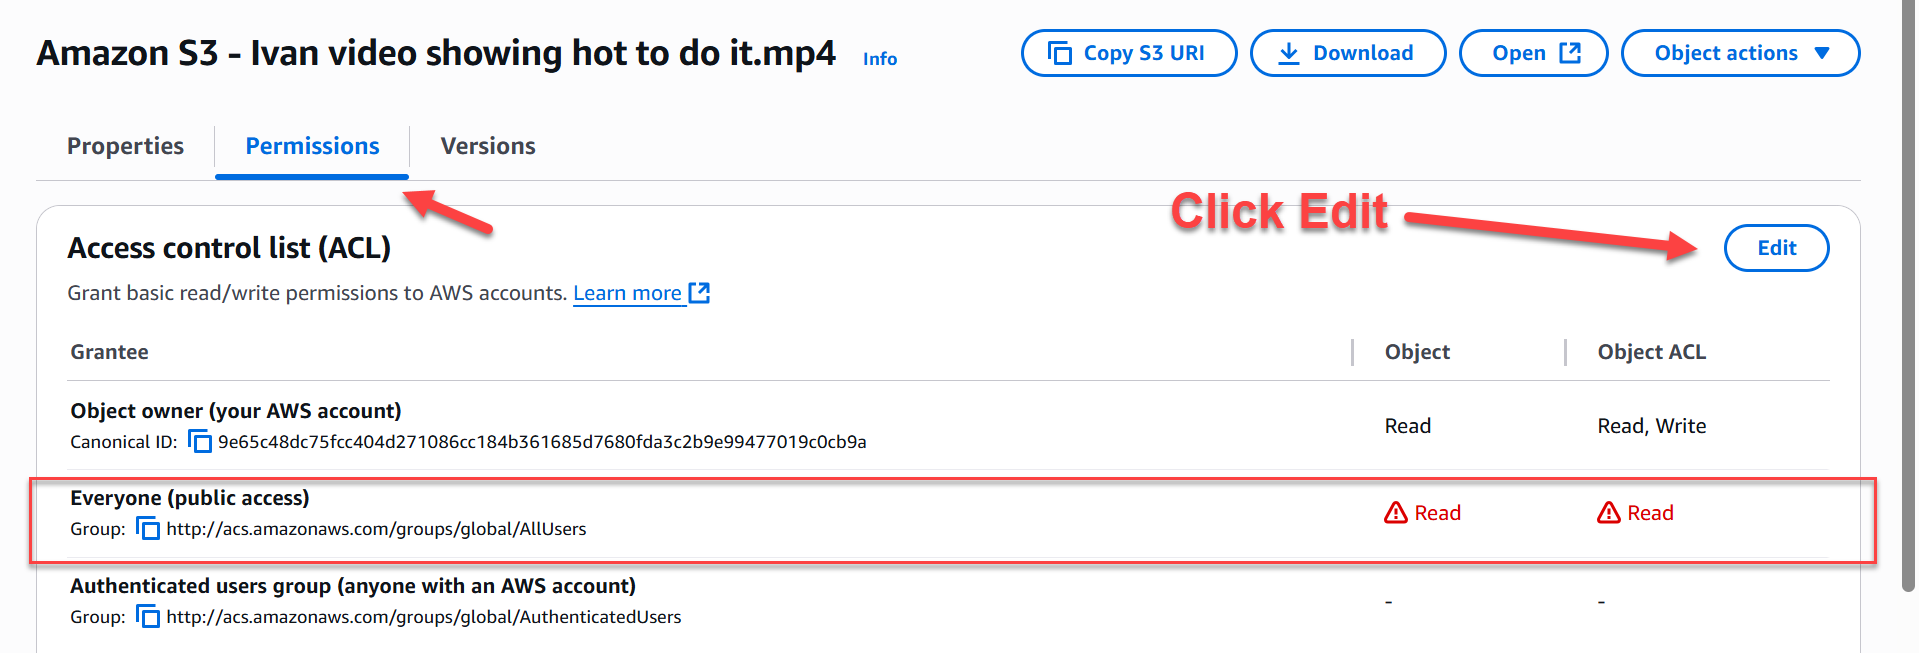
Instructions:
- On this page click Edit
Setting Permissions
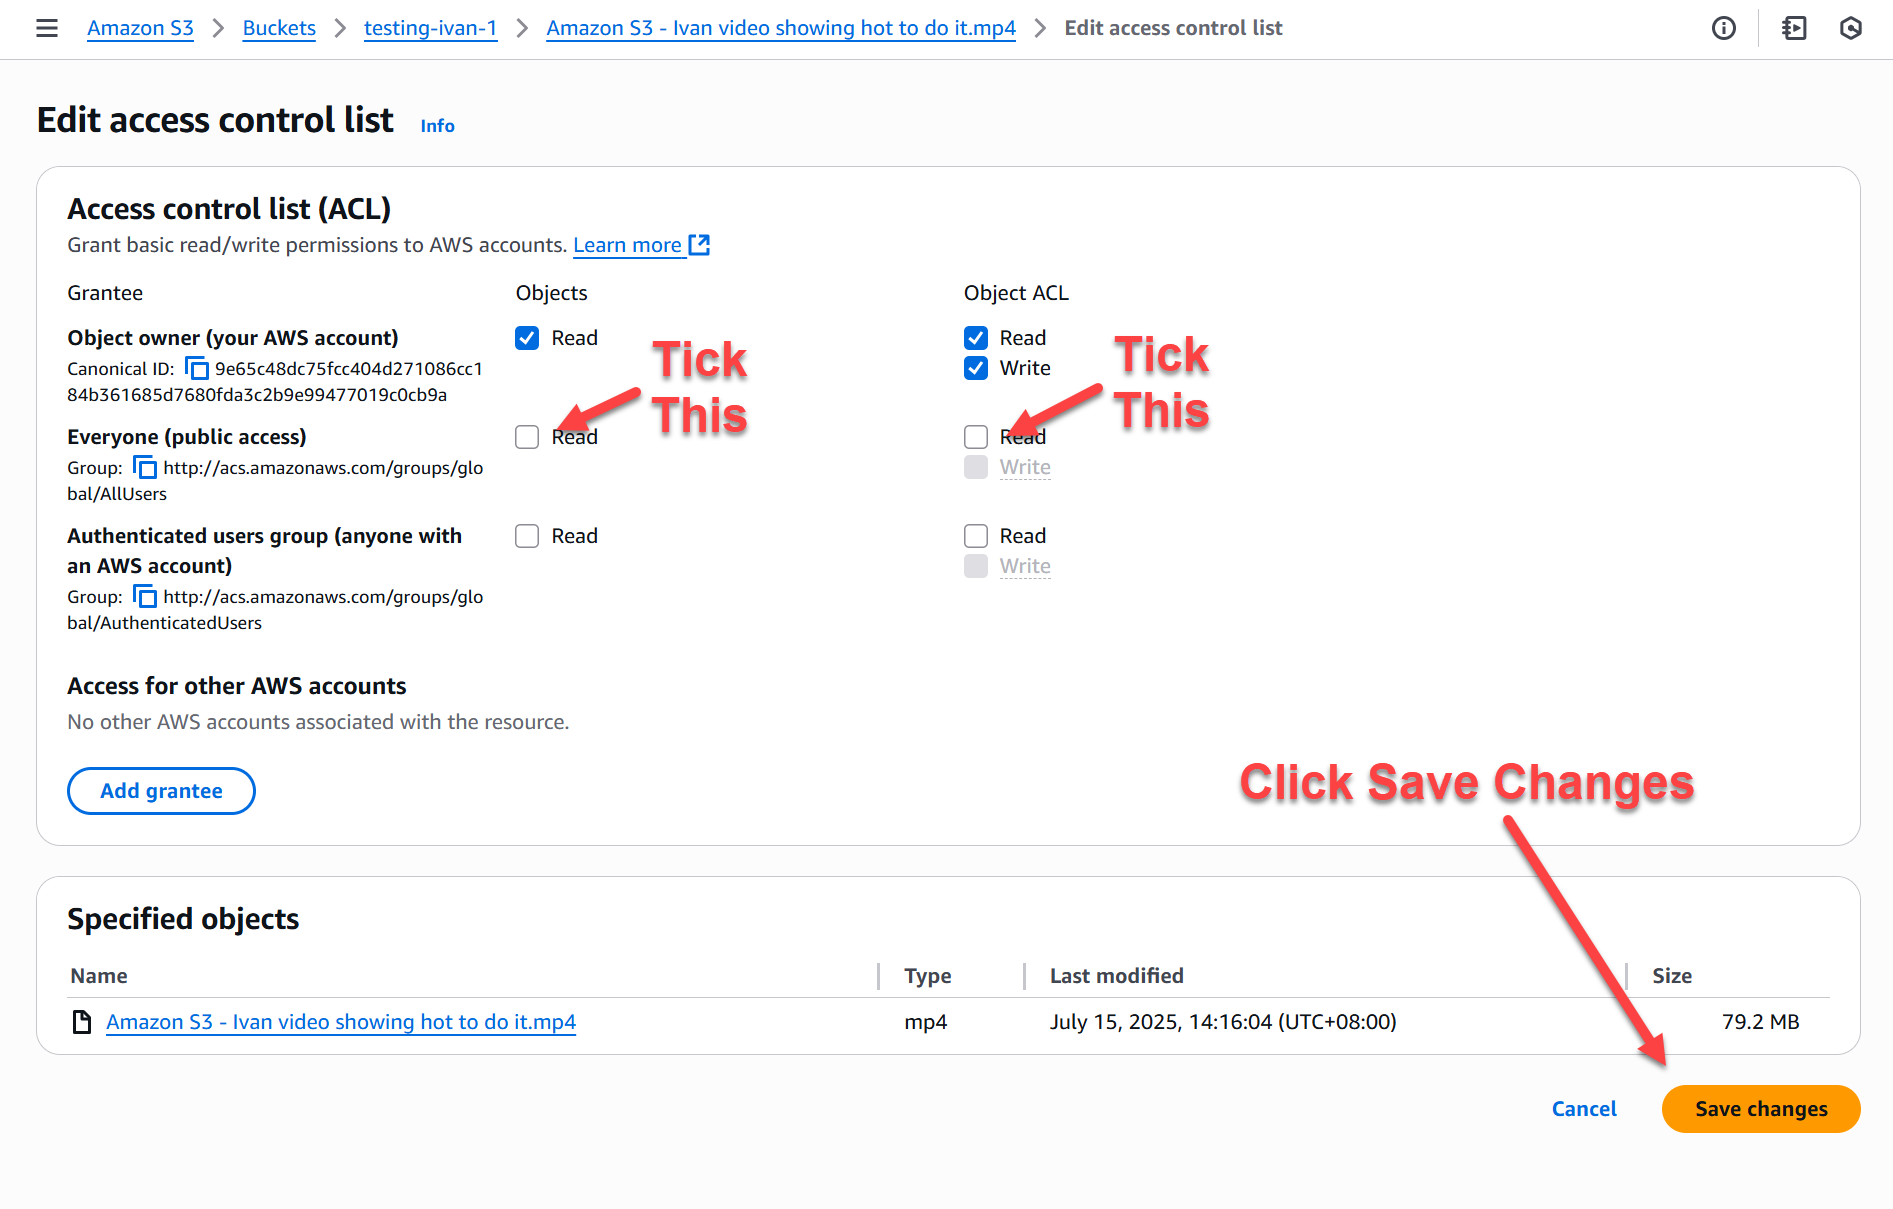
Instructions:
- On this page click the 2 Public boxes
- New box will appear, tick box
- Click Save Changes
Insert onto Website
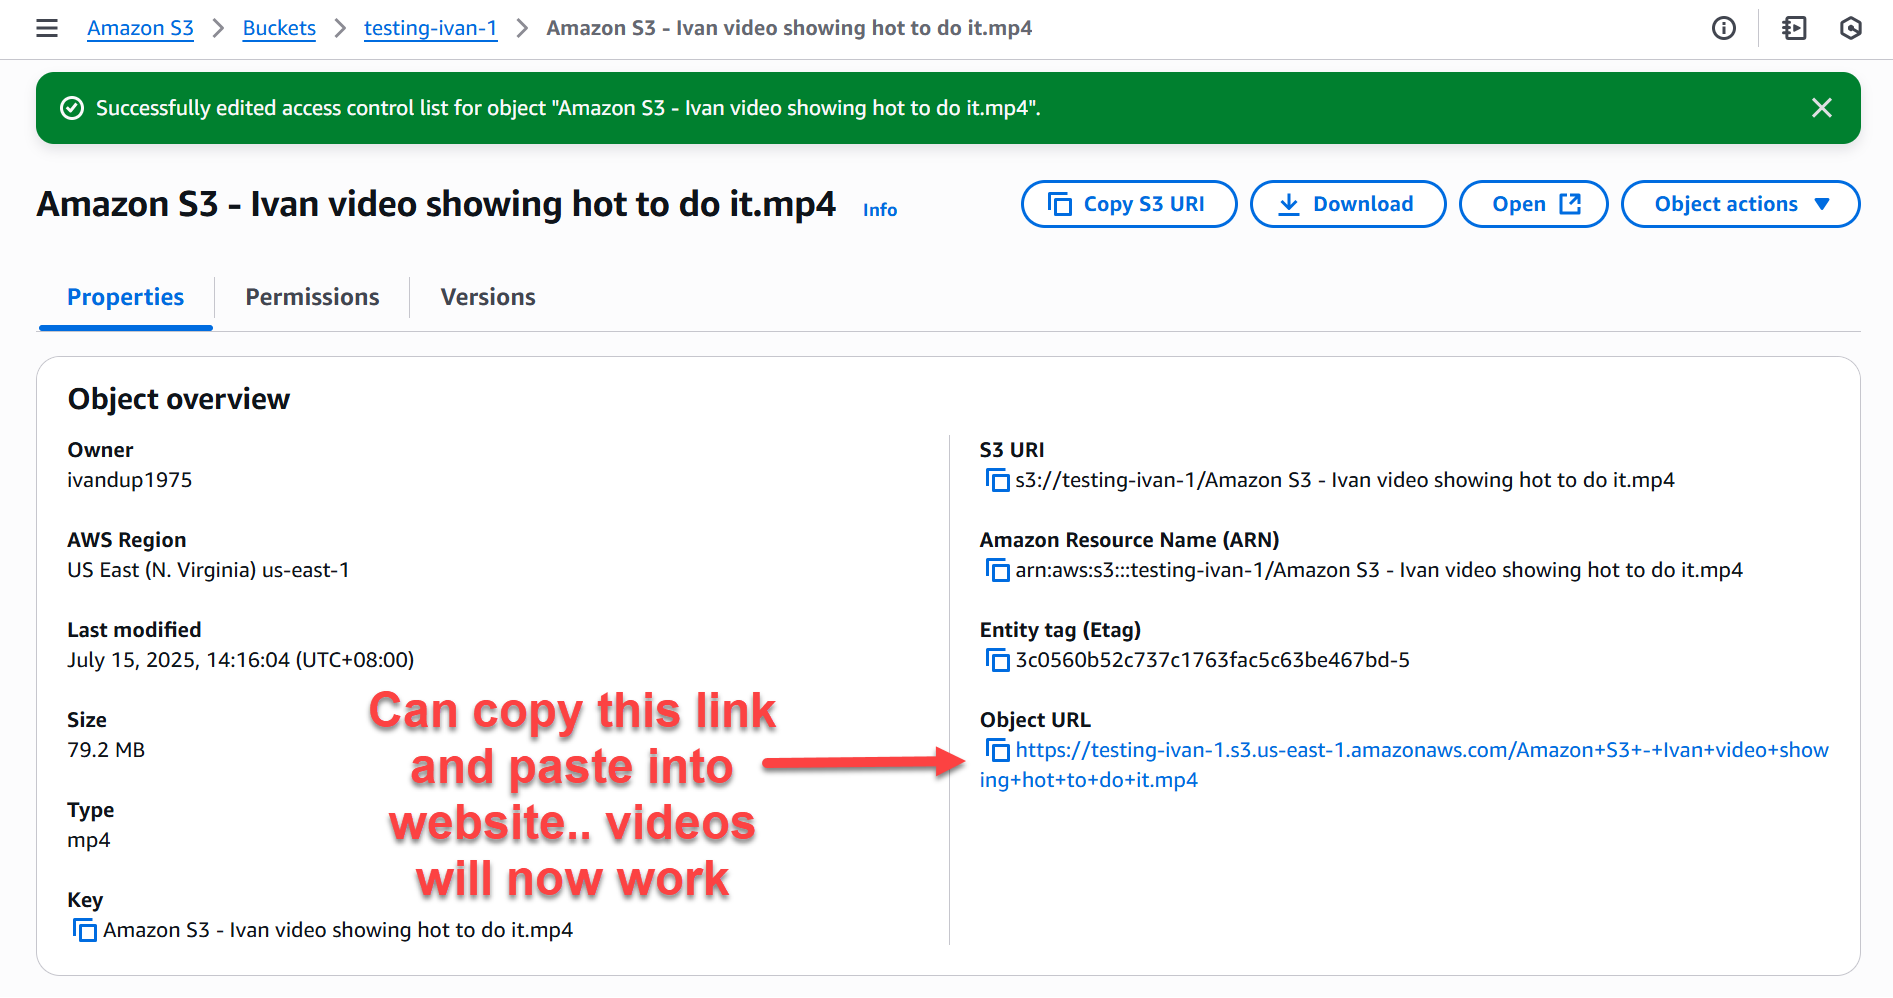
Instructions:
- Copy this Url and paste into website
- Insert a video widget in Elementor
- Choose Self Hosted and paste URL in
- Video works and will play.
- Job done!
Done! – Videos & Files are being hosted by Amazon S3 at dirt cheap prices and being streamed on my website.
Uploading Entire File into Amazon S3 (save-time)
Instructions:
- Open correct bucket
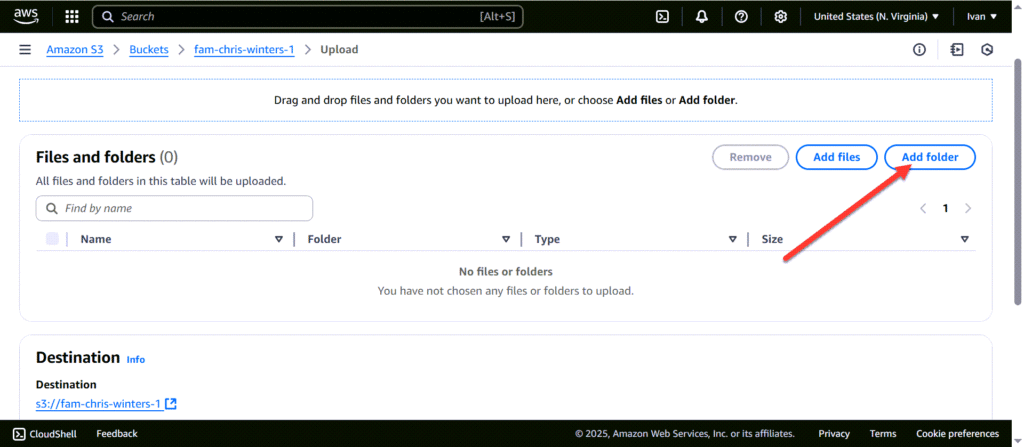
- Click Upload
- Choose Add Folder
- Choose correct folder on laptop
- Click Upload
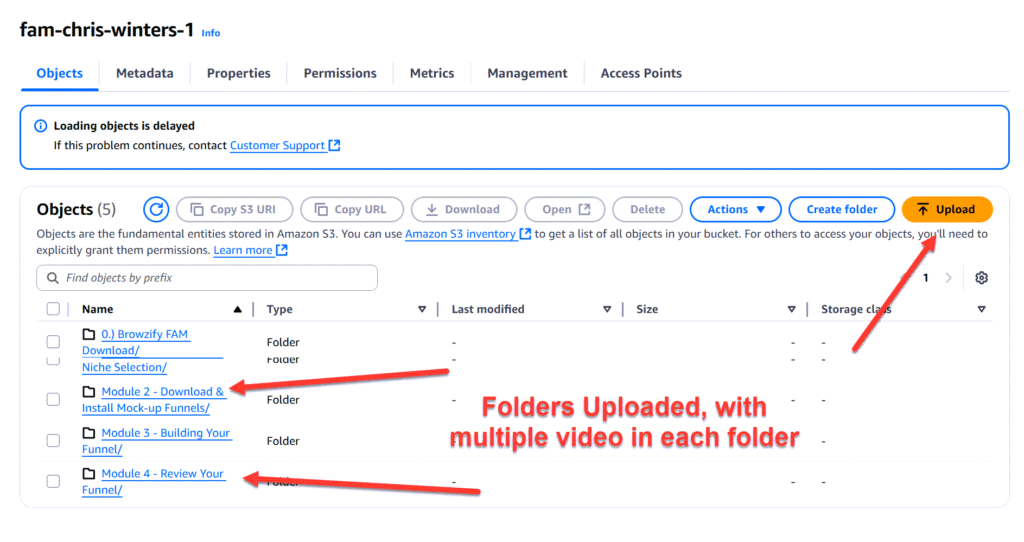
- Now folder + all items inside folder get uploaded to your bucket.
- Wen you open your bucket you will see the folders listed.
- To find items inside your folder, click on folder
- New window pops up with your items inside folder.
- You can copy URL’s and paste into your website.
Setting Permission For Entire Bucket (one-time)
✅ Make All Files in an S3 Bucket Public (Safe for Hosting Media)
⚠️ This makes everything in your bucket public — anyone with the link can see/download it. Only do this for buckets meant to host videos, images, etc.
🪜 Step-by-Step in Plain English
1. Go to Your S3 Bucket
Click on the name of your bucket
2. Disable “Block Public Access”
Inside your bucket → Click the “Permissions” tab
Find the section called “Block public access (bucket settings)”
Click “Edit”
Uncheck all four options (especially “Block all public access”)
Check the box that says “I acknowledge…”
Click Save
3. Add a Bucket Policy to Make Everything Public
Still under “Permissions” tab:
Scroll down to “Bucket policy”
Click Edit or Create bucket policy
Paste this into the editor — make sure to replace
YOUR-BUCKET-NAME-HERE:
COPY & PATE THIS:
{
"Version": "2012-10-17",
"Statement": [
{
"Sid": "PublicReadForWebsiteHosting",
"Effect": "Allow",
"Principal": "*",
"Action": "s3:GetObject",
"Resource": "arn:aws:s3:::YOUR-BUCKET-NAME-HERE/*"
}
]
}
✅ You’re Done!
Now any images, videos, or audio files you upload will be accessible from your website without needing to manually edit permissions each time.
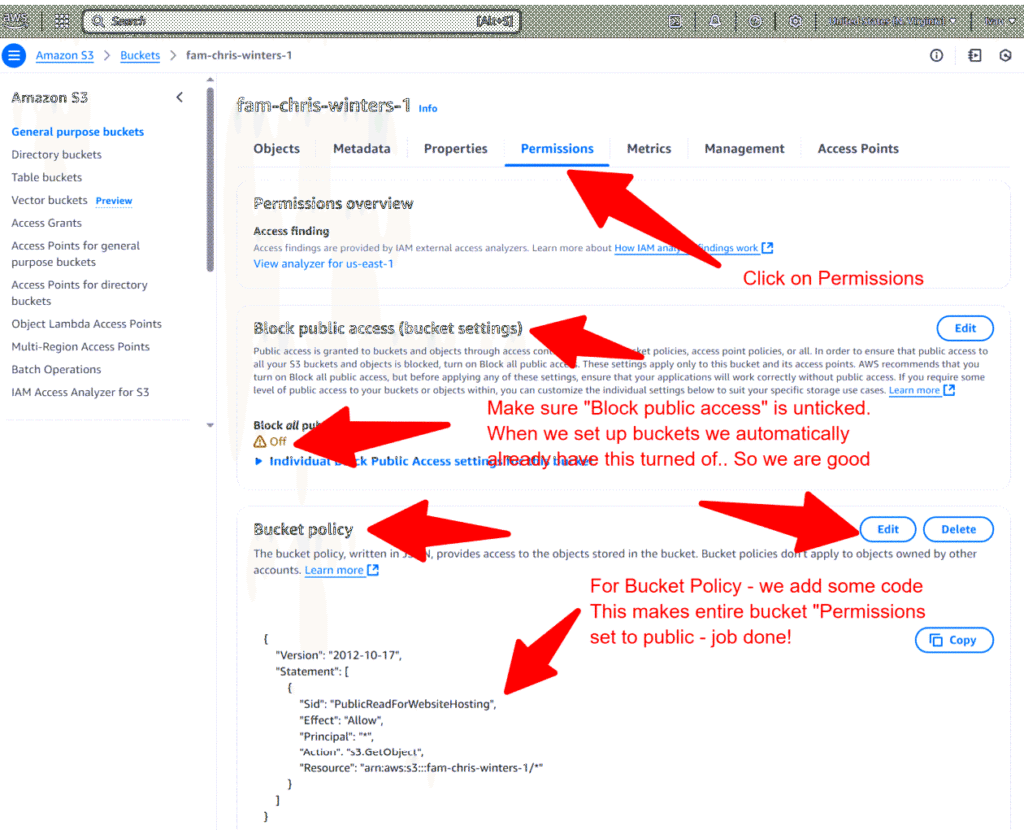
Instructions:
- Open correct bucket and click on Permissions
- Block public access – make sure its turned off, click Edit and check.
- When i create buckets i turn this off, so it should already be off.
- Bucket Policy – we are going to copy and paste code here, that will make all media inside the bucket public.
- Click on edit and paste the code in.
- Make sure to replace YOUR BUCKET NAME before you paste code in.
- Once done, save it, and now all media you upload to this bucket will be public.
- Allowing you to use it in your website and everything will work.
Amazon S3 Tutorial
© Copyright 2025 Digital Biz Leads – All Rights Reserved